Ultimate HomeLab Network: Connecting Everything with Tailscale
Over the past few years, I’ve tried several ways to connect devices scattered across different networks. I started with OpenVPN on my router, moved to an OpenWrt and WireGuard site-to-site setup, and then tried Cloudflare WARP for device-to-device access. Every option solved something, but each brought its own problems: fiddly configuration, awkward ACLs, poor phone support, or unreliable connections.
Tailscale was the first option that made the whole thing feel like something I didn’t have to keep thinking about.
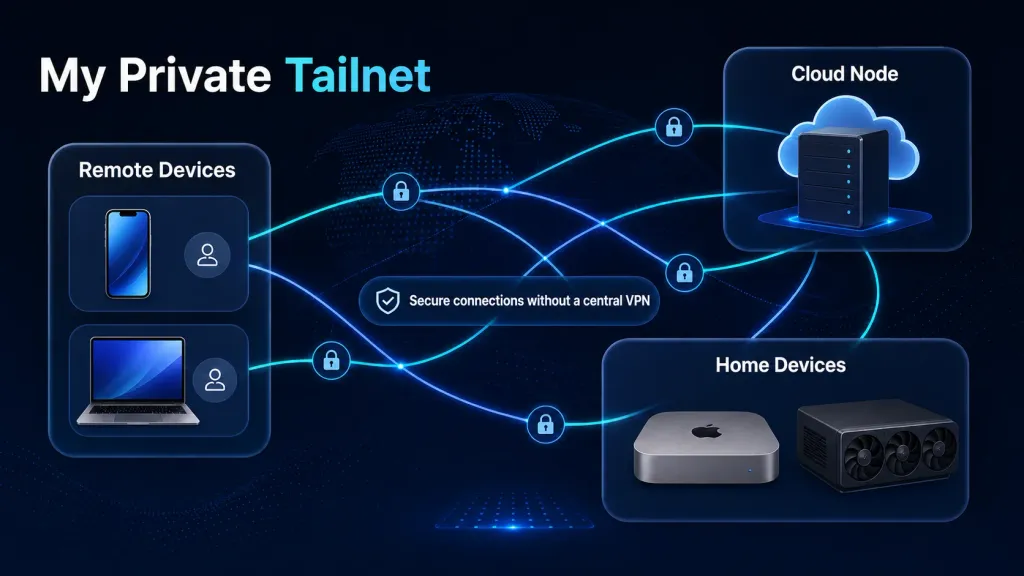
What I actually use it for
Here’s the short version: I don’t use Tailscale to route my entire Internet connection through a VPN. I use it so my devices can find each other securely.
These are the things I use most often:
-
Connecting to my Mac mini with VS Code Remote from anywhere
My Mac mini is my main development machine. I don’t want to sync my whole working environment everywhere or install the same toolchain on every laptop. As long as my work laptop is connected to Tailscale, I can use VS Code Remote SSH to connect straight to
home-mac.The nicest part is that I don’t need to expose a port on my home router or care whether my home IP has changed.
-
Opening private dashboards safely from my phone
I run a few personal systems: a finance dashboard, monitoring pages, and some internal tools. Some live on the Mac mini and others run on an Oracle Cloud VM.
None of them needs to be public on the Internet, and I don’t want to build a pile of login screens and reverse proxies around them. Instead, the services only listen on the tailnet or local network. I keep Tailscale on my phone and open them directly when I need them.
-
Using a free Oracle Cloud VM as an always-on node
Oracle Cloud’s free VM allowance is attractive, especially the Arm option that can be configured with 4 OCPUs and 24 GB of memory. I run some personal services on a VM in Japan and also use it as an egress point for selected traffic. I’ll go into that setup in the third post in this series.
-
Waking my GPU server only when I need it
My GPU server is noisy and power-hungry, so I don’t leave it running around the clock. Instead, I SSH into
home-mac, send a Wake-on-LAN packet togpu-server, and wait for it to join the tailnet. I can then reach the LLM server on it from any of my Tailscale devices.Tailscale works particularly well for a machine that sleeps most of the time and only appears on the network when needed.
How it differs from a traditional VPN
A traditional VPN feels like a tunnel. Once you connect, your computer is effectively dropped into another network, and its traffic often leaves through that network. Corporate VPNs and home-hosted OpenVPN setups commonly work this way.
That approach works, but it creates a few annoyances in a HomeLab:
- Connecting a phone from outside the house takes too much setup
- As the device count grows, you have more IPs, keys, and routes to maintain
- Access rules often end up spread across the firewalls of individual machines
- Adding a temporary cloud VM isn’t as flexible as it should be
Tailscale takes a different approach. Instead of dropping a device into one conventional LAN, it makes each device a member of the same overlay network. Every device has an identity tied to a login, and access can be managed centrally without relying on memorised IP addresses.
The important part is that Tailscale only handles traffic between devices in your tailnet by default. It doesn’t take over ordinary Internet traffic. That means my servers and work laptop can stay connected all day without sending everything through a VPN. If I do want full-tunnel routing, I can configure an exit node separately—but that isn’t the default.
| Option | What it does well | What bothered me |
|---|---|---|
| OpenVPN | Mature, widely supported, and well documented | Configuration and certificate management feel heavy; phones and multiple devices are awkward to manage |
| Manually configured WireGuard | Lightweight, fast, and clean | You own every peer, key, route, and ACL; it gets tedious as the network grows |
| Site-to-site VPN | Great for two fixed subnets | Not flexible enough for phones, laptops, and short-lived cloud VMs |
| Tailscale | Device-oriented, centrally managed, and easy to control with ACLs | You have to be comfortable with its control plane and identity-based login model |
How Tailscale connects devices underneath
Tailscale uses WireGuard for its data plane, but you don’t configure peers manually. When two devices need to communicate, they first exchange public keys and endpoint information through Tailscale’s coordination server. They then try NAT traversal—using mechanisms similar to STUN and ICE—to establish a direct peer-to-peer connection. If the NATs are too restrictive, the connection falls back to a Tailscale DERP relay.
Whether the path is direct or relayed, the traffic remains end-to-end encrypted with WireGuard. A DERP server only sees encrypted packets; it can’t decrypt their contents.
Direct connections work in most home and cloud setups, so traffic usually travels between the devices without passing through an intermediate node. A relay is only used when traversal fails. It may be slower, but the connection still works.
Devices matter more than IP addresses
My favourite thing about Tailscale is that it turns a network into a set of manageable devices rather than a list of IP addresses.
I don’t need to remember which 100.x.y.z address belongs to my Mac mini. With MagicDNS, I can simply name it home-mac. It sounds like a small detail, but it changes everyday use completely: SSH, dashboards, and internal tools all have stable names, and I never need to search my notes for an IP.
ACLs and tags
Central access control matters just as much to me.
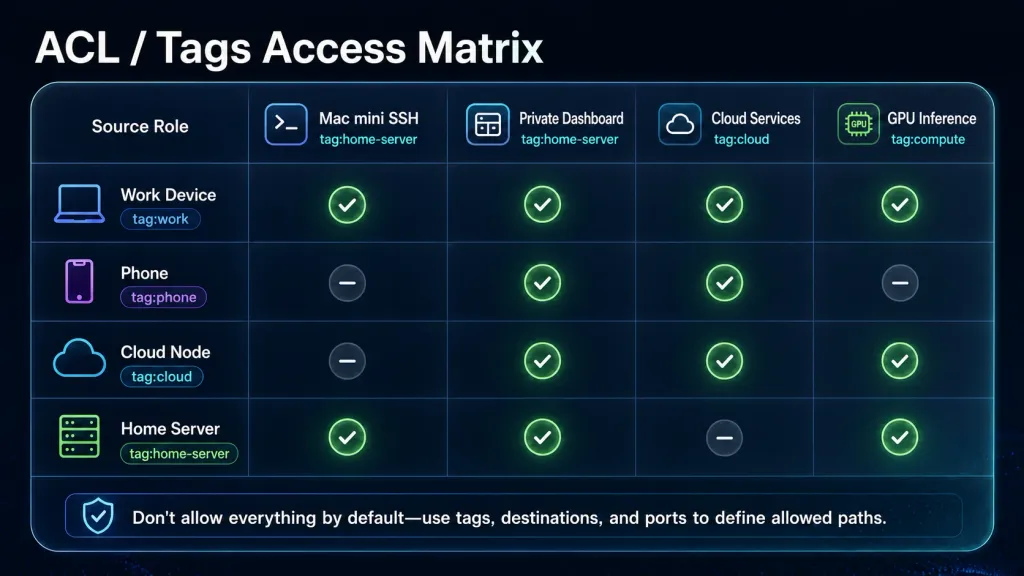
When I ran my own VPN or configured WireGuard by hand, I would often stop as soon as the network worked. The moment I wanted to limit which device could reach which port, I was back to editing firewalls one machine at a time. Tailscale lets me define ACLs or Grants in one place: who can connect, which services they can reach, and which machines belong to a particular role.
Tags fit a HomeLab nicely too. Categories such as tag:server, tag:cloud, and tag:personal are easier to maintain than rules tied to a VM’s IP address or hostname. If I rebuild or replace a machine, I can keep the same tag and avoid rewriting the whole access model.
It helps to separate topology from permissions. The topology answers “how do these devices find each other?” while ACLs and tags answer “who is allowed to reach each service?”
Up next
This post explains why I settled on this setup. The next one walks through the configuration: creating a tailnet, adding a Mac, phone, and Oracle Cloud VM, enabling MagicDNS, assigning tags, disabling key expiry for stable servers, and making VS Code Remote feel almost local.
If your HomeLab is still held together by memorised IPs, exposed ports, and a VPN you turn on occasionally, Tailscale is worth trying. It isn’t the most hardcore option, but it has caused me the fewest headaches by far.