My Tailscale HomeLab Setup Notes
The previous post explained how I use Tailscale to connect my Mac mini, phone, work laptop, and Oracle Cloud VM as one private network. This time, I’ll start with the basics: adding devices to a tailnet, giving them useful names, assigning tags, and defining access rules.
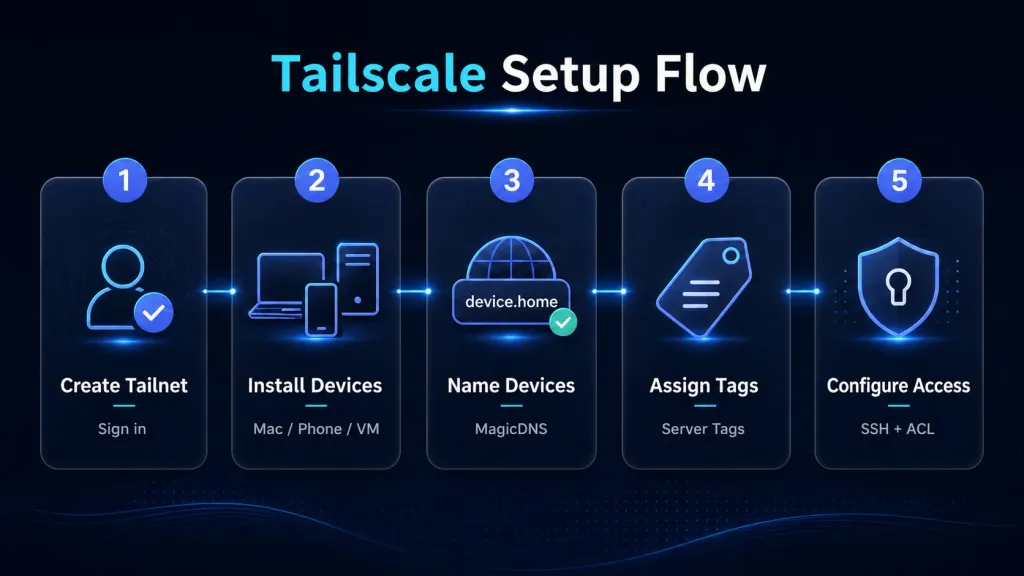
What we’re building
Let’s assume you have these devices:
home-mac       Mac mini at home and primary development machine
phone          iPhone or Android phone
work-laptop    Laptop used at work or while travelling
oracle-jp      Free Oracle Cloud VM in Japan
By the end, you should be able to:
- SSH from
work-laptoptohome-mac - Connect to
home-macwith VS Code Remote - Open a dashboard that’s only visible inside the tailnet from your phone
- Reach the Oracle Cloud VM from any device in the tailnet
- Do all of that without exposing ports on your home router or in Oracle Cloud
- Keep ordinary Internet traffic out of the VPN path
I recommend getting every device onto the same tailnet first and checking that they can find one another by name. Then classify the servers with tags, and only after that decide who should be able to connect to what. This keeps access policy from getting in the way before the network itself works.
Step 1: Create your tailnet
Start by creating an account at Tailscale. Once you’re signed in, you’ll have a tailnet of your own.
Think of a tailnet as a private network that belongs to you. Adding a device doesn’t expose it to the public Internet; it joins an overlay network that only you can administer.
If you sign up with a public email provider such as Gmail, Tailscale puts the account on its Personal plan. That’s generally enough for a small personal HomeLab, and it comfortably covers my handful of machines.
The page you’ll use most often is Machines. This is the device list where you’ll manage your Mac, phone, VMs, and servers.
Step 2: Install the clients
Go to Tailscale Download and install the client for each platform. Official clients are available for macOS, Windows, Linux, iOS, and Android. On personal computers and phones, install the app and sign in with the same account.
Once the clients are connected, open Machines in the Tailscale admin console and rename them to something you’ll recognise, such as:
home-mac
work-laptop
The Machines page shows each device’s name, tags, connection state, key expiry, and client version. You don’t need to understand every column on day one. Just check that the device appears in the list and is connected.
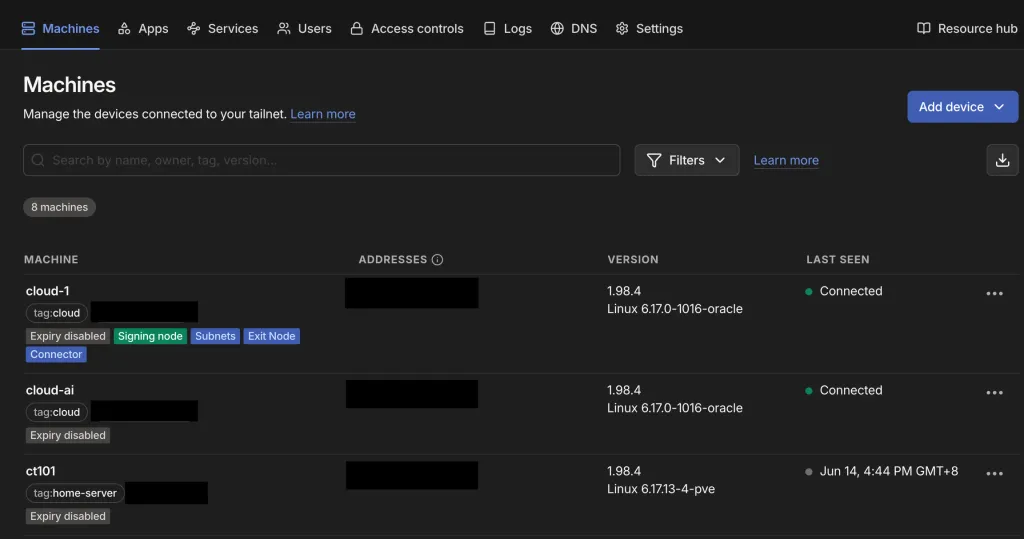
Good names are worth the minute they take. Tailscale includes MagicDNS, so after renaming a device you can connect by name instead of remembering a 100.x.y.z tailnet IP. The simple mental model is that MagicDNS is private DNS for your tailnet: it lets devices reach one another using machine names such as home-mac.
Don’t worry about tightening permissions yet. At this point, you only want to confirm that the devices have joined the same tailnet.
For example:
ssh your-user@home-mac
ping home-mac
The MagicDNS documentation explains the DNS behaviour in more detail. For a HomeLab, the main point is simple: a stable name such as home-mac is far more useful than a 100.x.y.z address.
Step 3: Add a Linux server
For an Oracle Cloud VM, a Linux server at home, or a GPU server, I use the Linux server flow in the admin console.
Open Machines → Add device → Linux server. The page asks for a few preferences and then generates an installation script for that server.
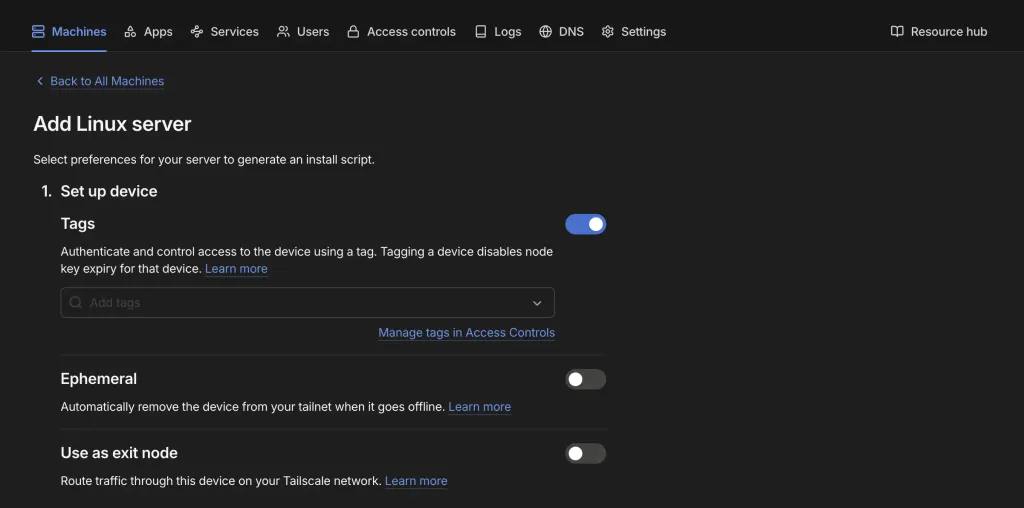
Here’s what the main options mean:
- Tags: Assign the machine a server identity such as
tag:cloud - Ephemeral: Remove a temporary machine automatically after it goes offline; leave this off for a long-lived VM
- Use as exit node: Let other devices route Internet traffic through this server; we don’t need that for this guide
After you run the generated script, the VM should appear in Machines. I rename mine to oracle-jp, which makes both connections and access rules much easier to read.
Step 4: Classify servers with tags
Personal computers and phones can remain tied to your user account, but I prefer to manage servers with tags.
Think of a tag as a machine identity. For example:
| Tag | How I use it |
|---|---|
tag:home-server |
An always-on Mac mini or server at home |
tag:cloud |
A cloud machine such as an Oracle Cloud VM |
tag:jp-connector |
A machine used later as a connector or Japanese egress point |
You can assign tags in two places:
- Choose them in Add Linux server when adding a new machine
- Open an existing machine from Machines and edit its ACL tags
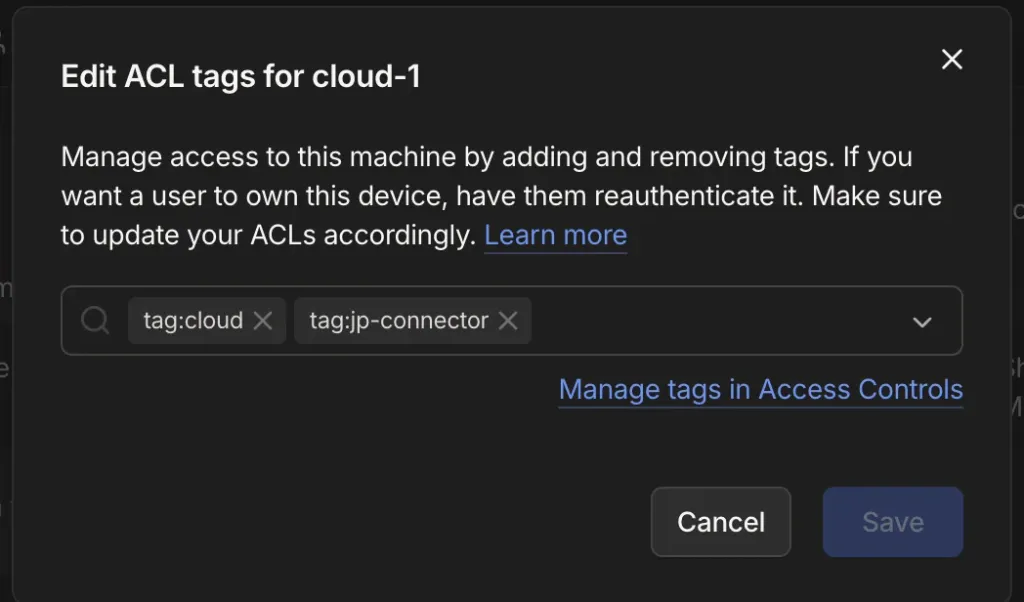
One detail matters here: a tag isn’t merely a label in the UI. It changes the machine’s identity and permissions. Once the Oracle VM has tag:cloud, you can write a rule for “cloud servers” instead of tying it to one specific machine.
Advanced: Defining a tag owner when the UI asks for one
Some tags need a policy that defines who is allowed to assign them. This setting is called tagOwners.
{
  "tagOwners": {
    "tag:home-server": ["autogroup:admin"],
    "tag:cloud": ["autogroup:admin"],
    "tag:jp-connector": ["autogroup:admin"]
  }
}
You don’t need to memorise the JSON. It simply says that an admin can assign the home-server, cloud, and jp-connector tags to machines.
Advanced: Assigning tags from the CLI
If you prefer the CLI, you can advertise a tag like this:
sudo tailscale up --advertise-tags=tag:cloudIf you also want to treat the Mac mini as a server, you could use:
sudo tailscale up --advertise-tags=tag:home-serverBe careful when mixing a macOS app with CLI state. Check the current state first:
tailscale status
tailscale ip
You don’t have to design every tag on your first day. Still, I recommend tagging at least your cloud VM and any always-on server. It makes the access policy much clearer later.
Step 5: Decide who can connect to what
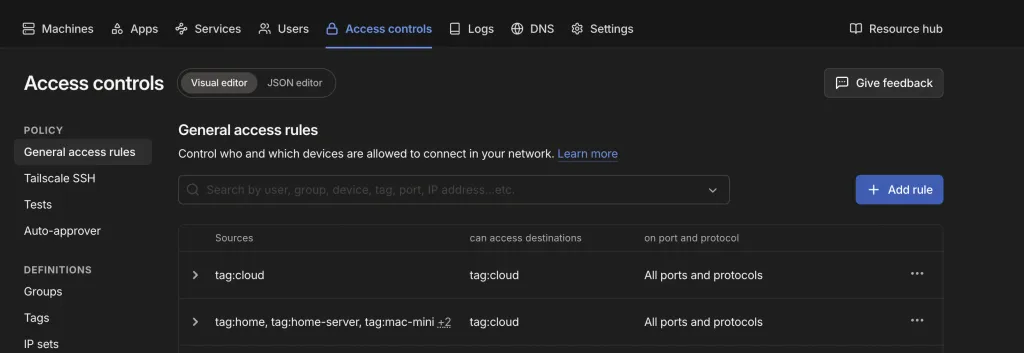
This is where Access controls comes in. Think of it as a firewall policy for the tailnet: it defines who can be a source, which device can be a destination, and which ports are available.
If this is your first time using it, start with the Visual editor. It lets you choose:
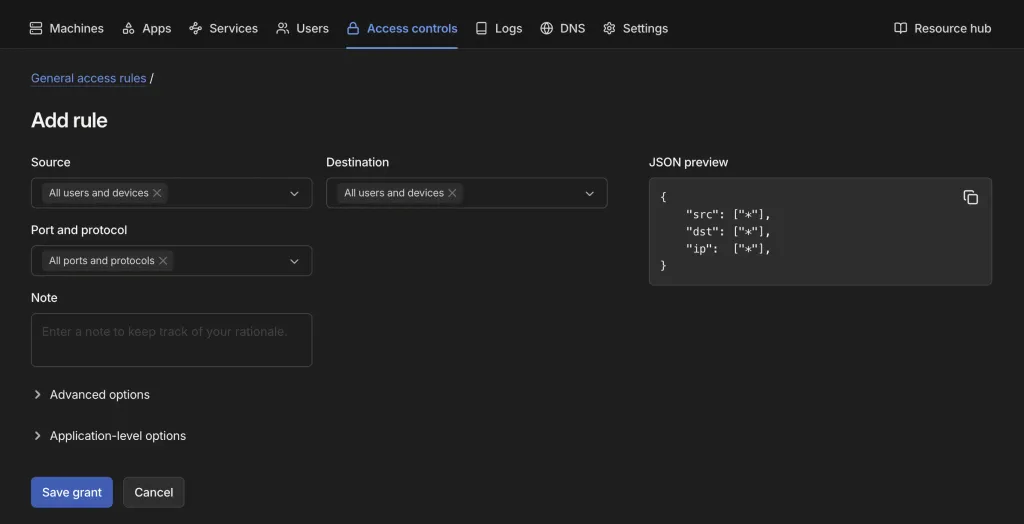
- Source: The user, device, or tag initiating the connection
- Destination: The target, such as
tag:home-server - Port and protocol: The allowed service, such as port
22for SSH
When you add a rule, the form appears on the left and a JSON preview updates on the right. They aren’t two separate policy systems—the visual editor simply generates the same policy through a form. Focus on the left side at first and come back to the JSON when you want finer control.
I would start with broad enough rules to prove that the setup is useful, then tighten them after you’ve lived with it for a while. Two sensible starting points are:
- Your personal devices can SSH to
home-mac - Devices with server tags can reach the service ports they need on other servers
Advanced: An approximate JSON version of those rules
{
  "acls": [
    {
      "action": "accept",
      "src": ["autogroup:member"],
      "dst": ["tag:home-server:22"]
    },
    {
      "action": "accept",
      "src": ["tag:home-server", "tag:cloud"],
      "dst": ["tag:cloud:*"]
    }
  ]
}
This is an example, not a complete production policy. The three fields to understand are src for the source, dst for the destination, and the number after the colon for the port.
Step 6: Disable key expiry for stable machines
Tailscale expires device keys by default, which is a useful security measure. But key expiry can be inconvenient for a long-lived server: you don’t want an always-on machine to suddenly require an interactive login when you need it most.
I disable key expiry in the admin console for machines such as:
home-macoracle-jp- Any server that needs to remain reachable or be woken remotely
I decide separately for phones and ordinary laptops; they don’t necessarily need it disabled.
There isn’t a trick here. Find the device on the Machines page and disable expiry. Just remember that this is a trust decision. If a key never expires, keeping the machine patched and protecting its login becomes even more important.
Step 7: Decide whether to enable Tailscale SSH
If you’d like to manage fewer SSH keys, consider Tailscale SSH. It lets Tailscale handle authentication and authorisation for SSH connections inside the tailnet. Instead of relying only on authorized_keys, you can manage who may SSH to each machine through Access controls.
Enable it on a supported machine with:
sudo tailscale up --sshThen add an SSH rule to Access controls.
Advanced: Example JSON for Tailscale SSH
{
  "ssh": [
    {
      "action": "accept",
      "src": ["autogroup:member"],
      "dst": ["tag:home-server"],
      "users": ["autogroup:nonroot", "your-user"]
    }
  ]
}
If you already have an SSH key workflow that you like, keep using it. The important job Tailscale does here is network connectivity. You can decide later whether it should also handle SSH authentication.
Step 8: Connect to the Mac mini with VS Code Remote
Once work-laptop and home-mac are in the tailnet and SSH works between them, you’re ready for VS Code Remote SSH.
Add an entry to ~/.ssh/config:
Host home-mac
  HostName home-mac
  User your-user
In VS Code, run Remote-SSH: Connect to Host... and select home-mac.
It feels a little like carrying the Mac mini with me even though it’s still running at home. All the node_modules, Docker containers, local databases, and development tools stay on that machine, so I don’t need to reproduce the environment on every laptop.
A couple of practical tips
- Don’t make Access controls complicated on day one. Get the network working first.
- Don’t forget the Linux host firewall, such as
ufworfirewalld. Even when Tailscale is connected, the local firewall may still block the service port.
At this point, your HomeLab has gone from a collection of scattered machines to one manageable private network.
The next post covers my favourite advanced use case: keeping ordinary Internet traffic on the normal connection while using a Tailscale App Connector to send only OpenAI and ChatGPT traffic through an Oracle Cloud VM in Japan.